Setup Guide for AWS
Overview
Snowplow Mini is, in essence, the Snowplow real time stack inside of a single image. It is an easily-deployable, single instance version of Snowplow that serves three use cases:
- Giving a Snowplow consumer (e.g. an analyst / data team / marketing team) a way to quickly understand what Snowplow "does" i.e. what you put it at one end and take out of the other
- Giving developers new to Snowplow an easy way to start with Snowplow and understand how the different pieces fit together
- Giving people running Snowplow a quick way to debug tracker updates
All setup for Snowplow Mini is done within the AWS Console and will incur small amounts of running costs, depending on the size of the EC2 instance you select.
We offer Snowplow Mini in 3 different sizes. To decide on which size of Snowplow Mini to choose, read on.
large & xlarge & xxlarge
Mini is available in 3 different sizes:
large: Opensearch has4gheap size and Snowplow apps has0.5gheap size. Recommended machine RAM is8g.xlarge: Double the large image. Opensearch has8gheap size and Snowplow apps has1.5gheap size. Recommended machine RAM is16g.xxlarge: Double the xlarge image. Opensearch has16gheap size and Snowplow apps has3gheap size. Recommended machine RAM is32g.
This service is available as an EC2 image within the AWS Community AMIs in the following regions:
Version 0.15.1 (Recommended)
| region | large / t2.large | xlarge / t2.xlarge | xxlarge / t2.xxlarge |
|---|---|---|---|
| ap-northeast-1 | ami-0158e0fab2c8e6e65 | ami-02c8bc6c0972ab714 | ami-0e9c2659cf4ffd908 |
| ap-northeast-2 | ami-09a04e181a5de15bd | ami-0c407c2324287b631 | ami-0e16065214735e004 |
| ap-south-1 | ami-05b4b3d599b1b0b2a | ami-08922b559d6d5632c | ami-01632963dacfbbfef |
| ap-southeast-1 | ami-08e5e96ce93bef1d6 | ami-00ea092138a7cb44a | ami-0bc8f4fdd09686edb |
| ap-southeast-2 | ami-0f352ba78d75f5772 | ami-069a0da7a93d82fd7 | ami-09d98c0b4d44572f3 |
| ca-central-1 | ami-03887e17dd665d5e6 | ami-006bbee3099ee35ce | ami-0e978a3b52e4de249 |
| eu-central-1 | ami-02c88c24820cdde69 | ami-022f28d1e79f2e920 | ami-0333d939f89191723 |
| eu-west-1 | ami-09cf7e5acdbc9e8ad | ami-0923e4c14bf9f589e | ami-0e2fed0c9cbc61e30 |
| eu-west-2 | ami-0178b420c5b099ea2 | ami-018549cc21741ad02 | ami-01bd2ff1da1016d4c |
| sa-east-1 | ami-0f8ce9d7dfd9bfd80 | ami-0e02a0a64b0c1311f | ami-00bdbe42884c14148 |
| us-east-1 | ami-0dcc21519a5e648a8 | ami-0452d8233d5246d86 | ami-01165ee3a5fa44a93 |
| us-east-2 | ami-0244938cf238eedda | ami-03491c53c6505e179 | ami-08b98725a7ccf7628 |
| us-west-1 | ami-0ae6e88dfc5986a3a | ami-0b54fd197b9a3361a | ami-041fc48a39008a9cc |
| us-west-2 | ami-0c460da85e5c76945 | ami-03c0097dd40222c64 | ami-0462172d15246aa5f |
The software stack installed:
- Snowplow Stream Collector NSQ 2.8.2
- Snowplow Stream Enrich NSQ 3.6.1
- Snowplow Elasticsearch Loader 2.0.8
- Snowplow Iglu Server 0.8.7
- Opensearch 2.4.0
- Opensearch Dashboards 2.4.0
- Postgresql 15.1
- NSQ v1.2.1
Note: All services are configured to start automatically so everything should happily survive restarts/shutdowns.
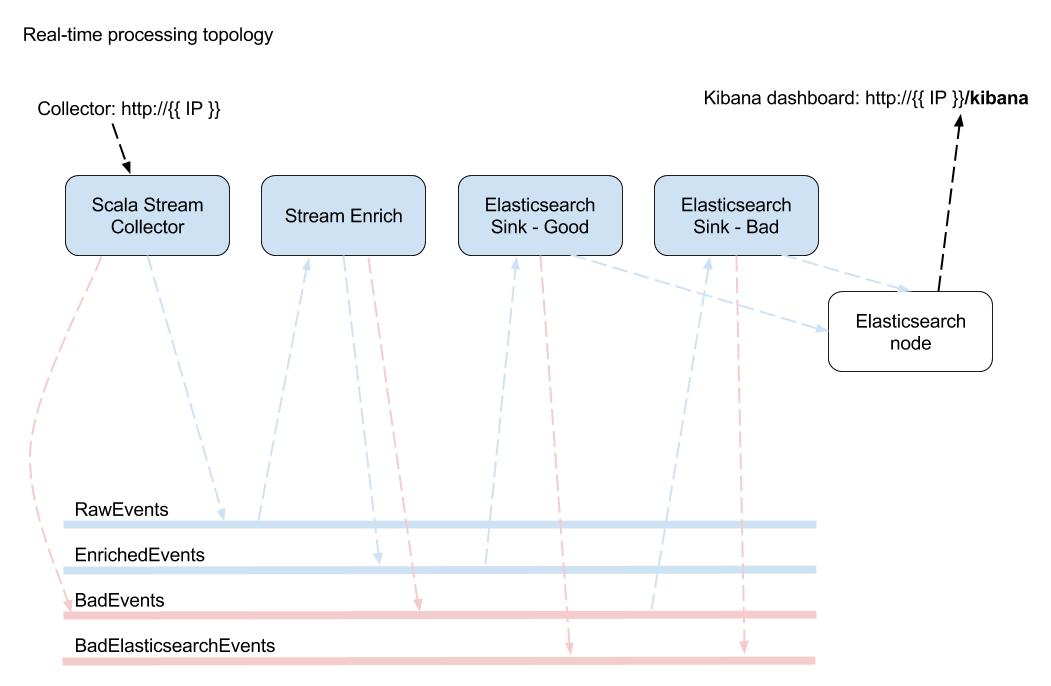
To understand the flow of data please refer to the following diagram:

IAM
Create a role with the following configuration
- Step 1: For
Select type of trusted entity, selectEC2 - Step 2.1: For
Attach permissions policies, create a policy with the following
{
  "Version" : "2012-10-17",
  "Statement": [
    {
      "Effect": "Allow",
      "Action": [
        "s3:GetObject",
        "logs:CreateLogStream",
        "logs:PutLogEvents"
      ],
      "Resource": ["*"]
    }
  ]
}
- Step 2.2: In step 2 of role creation, select the policy created in the previous step
- Step 3: Tags are optional
- Step 4: Fill in the role name and create it.
CloudWatch
Create a log group named snowplow-mini so that Mini can emit logs to this log group.
Mini will not function properly if a log group with that name isn't found.
Security Group
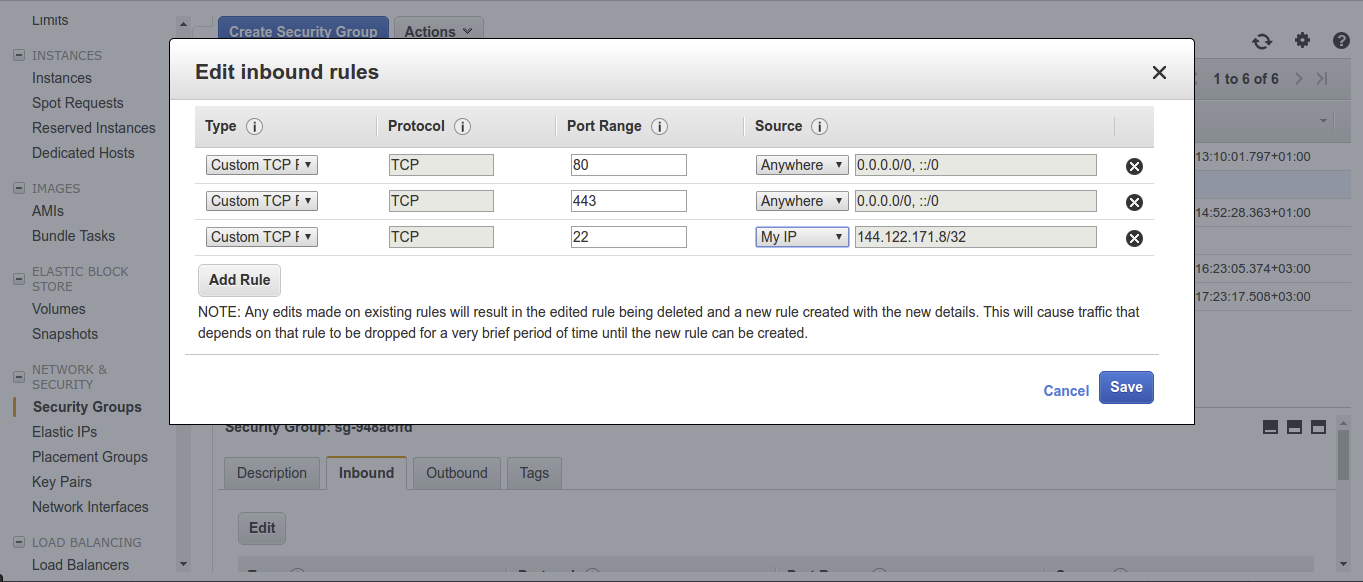
In the EC2 Console UI select Security Groups from the panel on the left.
Select the Create Security Group button and fill in the name, description and what VPC you want to attach it to.
You will then need to add the following InBound rules:

- Custom TCP Rule | Port Range (80)
- CIDR range
0.0.0.0/0 - Custom TCP Rule | Port Range (443)
- CIDR range
0.0.0.0/0 - SSH (optional):
- Custom TCP Rule | Port Range (22)
- CIDR range
{{ YOUR IP HERE }}/32
For OutBound you can leave the default to allow everything out.
Choose AMI
In the EC2 Console UI select the Launch Instance button then select the Community AMIs button. In the search bar enter snowplow-mini-0.15.0 to find the needed AMI and then select it.
Choose Instance Type
0.15.1 AMI names explicitly specifies which instance type to use.
0.15.1-largeneedst2.large0.15.1-xlargeneedst2.xlarge0.15.1-xxlargeneedst2.2xlarge
Configure Instance
Select the IAM role created above.
If you created your Security Group in a different VPC than the default you will need to select the same VPC in the Network field.
NOTE: If you select a custom VPC ensure that you select Enable for the Auto-assign Public IP option.
Add Storage
Depending on how long you intend to run Snowplow Mini and how much data you intend to send/store you will need to change the size of the block store accordingly.
For basic testing and debugging;
- 20-50 Gb should suffice for
large - 50-100 Gb should suffice for
xlarge - 100-200 Gb should suffice for
xxlarge
We also recommend changing the Volume Type to GP2 from Magnetic for a smoother experience.
Tag Instance
Add any tags you like here.
Configure Security Group
Select the Security Group you created above.
Review
Press the Launch button and select an existing key-pair, or create a new one, if you want to be able to SSH into the box.
Telemetry notice
By default, Snowplow collects telemetry data for Mini (since version 0.13.0). Telemetry allows us to understand how our applications are used and helps us build a better product for our users (including you!).
This data is anonymous and minimal, and since our code is open source, you can inspect what’s collected.
If you wish to disable telemetry, you can do so via the API.
See our telemetry principles for more information.